
Introduction
A pipette can appear to work normally even when the volume it delivers no longer meets the limits for your work. A routine pipette accuracy test helps you check for performance changes between scheduled calibrations.
This guide explains how to weigh repeated water dispenses, convert mass to volume, and compare the results with the limits for the pipette and tested volume. We assess average error and repeatability separately: closely grouped readings can still be consistently above or below the setting. A worked example shows the calculations, followed by guidance on investigating unexpected results.
This micropipette accuracy check is intended for single-channel air-displacement models. It assumes a suitable weighing setup and that the pipette, tips, and water have reached thermal equilibrium with the test room. Results apply to the tested pipette–tip combination and conditions. The check supports routine monitoring but does not replace a complete calibration.
What You Need Before a Pipette Accuracy Test
Prepare the Equipment and Test Conditions
Prepare the pipette, compatible tips, distilled or deionized water, a clean weighing vessel, a calibrated laboratory balance, and a worksheet. You will also need suitable thermometers for the water and room air, plus a barometer for local atmospheric pressure.
Choose a balance capable of assessing the volumes and error limits involved. For example, a display increment of 0.001 g equals 1 mg, approximately the mass of 1 µL of water. At a 20 µL setting, one increment represents about 5% of the target volume, making that readout too coarse for assessing small delivery errors. Balance repeatability and measurement uncertainty must also support the intended comparison.
Place the balance on a stable surface away from drafts and vibration. Allow the pipette, tips, and water to reach thermal equilibrium with the test room. Record the water temperature before and after the measurements, together with room temperature and local atmospheric pressure. These records support selection of the mass-to-volume conversion factor used later. Include room humidity in the record where required by the test procedure.
For the weighing procedure below, add enough test water to cover the bottom of the receiving vessel before taring. Use an evaporation trap or another suitable arrangement to limit water loss, particularly at small test volumes. Closing the balance draft shield alone does not eliminate evaporation.
Before collecting readings, record the pipette model, volume range, and tip reference. Locate the manufacturer’s mean-error and repeatability limits for each planned test volume, including any specified tip and test conditions. Keep the limits and their source alongside the measurement record.
Check Tip Fit and Obvious Leakage
Inspect the pipette’s tip cone and fit a fresh, compatible tip. Check for damage, loose seating, or unusual attachment force. Follow the manufacturer’s water-based leak-check instructions, including the specified volume, holding position, and observation time.
Investigate unexpected dripping or changes in the liquid column. If the problem persists with a fresh, correctly seated tip, arrange inspection before collecting measurements. Passing a leak check does not establish volume accuracy; the weighing procedure provides the quantitative assessment.
For more detail on model compatibility and seal fit, see our filter pipette tip selection guide.
How to Run a Quick Gravimetric Pipette Accuracy Test
ISO 8655-6 describes the gravimetric reference measurement procedure for determining volume. The procedure below is a simplified routine check and does not meet all the requirements of that reference procedure.
Choose the Test Volumes and Repetition Count
For this example, check a 20–200 µL pipette at two settings:
| Test point | Volume setting | Recorded measurements |
|---|---|---|
| Nominal volume | 200 µL | 4 |
| Lower end of the specified range | 20 µL | 4 |
This design follows a published routine quick-check procedure. We use the four-reading series as an initial screen; it provides only a limited estimate of repeatability. If your laboratory’s procedure specifies additional test points or repetitions, include them.
Keep every setting within the pipette’s operating range. Include a frequently used intermediate volume when performance at that setting matters; endpoint results alone do not establish performance throughout the range.
Weigh and Record Each Dispense
The sequence below describes forward pipetting with a manual air-displacement pipette. For an electronic model, use the corresponding mode and the manufacturer’s specified operating settings.
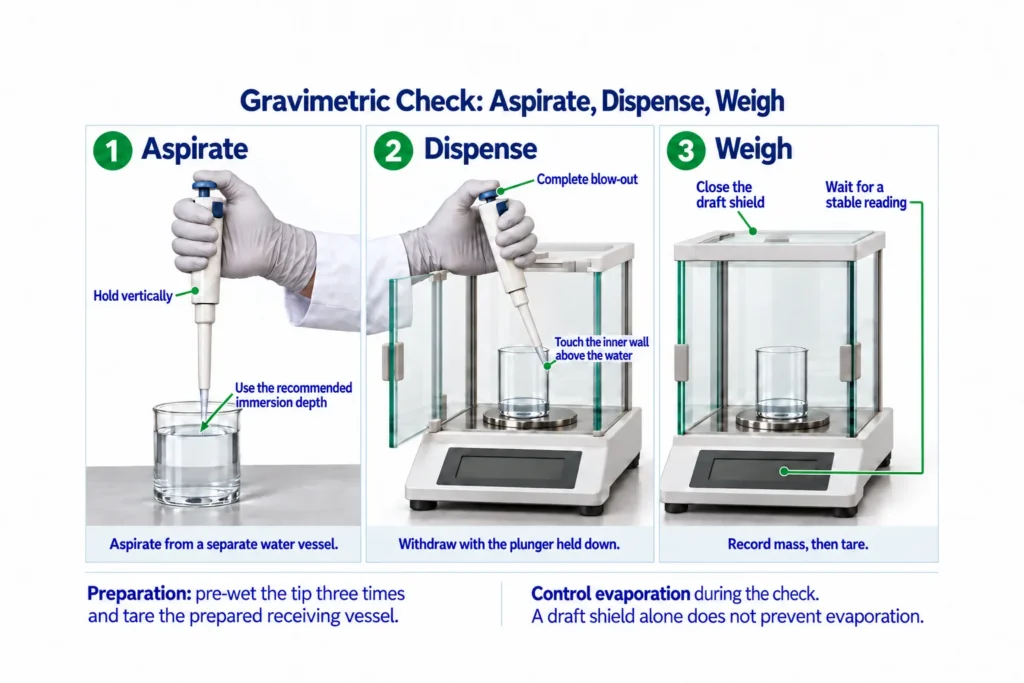
- Set the pipette to 200 µL and fit a fresh, compatible tip. Pre-wet it by aspirating and dispensing water three times at that setting. Discharge the preparation water into a separate vessel and exclude these cycles from the measurements.
- With the prepared receiving vessel on the balance, close the draft shield and tare. The vessel should already contain the small amount of water described in the preparation section.
- Press the plunger to the first stop before immersing the tip. Hold the pipette vertically, immerse to the manufacturer’s recommended depth, and release the plunger smoothly. Allow aspiration to finish before withdrawing the tip.
- Place the tip against the receiving vessel’s inner wall above the water surface. Press the plunger to the first stop, wait for liquid flow to finish, then press to the second stop for blow-out. Keep the plunger depressed while sliding the tip along the wall and withdrawing it. Release the plunger after withdrawal.
- Close the draft shield and record the mass in milligrams as soon as the reading stabilizes. Tare again before beginning the next measurement cycle.
- Repeat steps 3–5 three more times with the same tip, giving four recorded measurements at 200 µL.
- Discard the tip and set the pipette to 20 µL. Fit a fresh tip of the same model, pre-wet three times at the new setting, and repeat the taring and weighing sequence to collect four readings.
Keep aspiration speed, waiting times, and the interval between taring and reading consistent. Retain the raw measurements and document any evaporation correction needed before converting mass to volume.
Calculate the two volume settings separately. Each series assesses repeated delivery with one fitted tip; variation between individual tips requires a separate sampling design.
How to Calculate Pipetting Accuracy and Precision
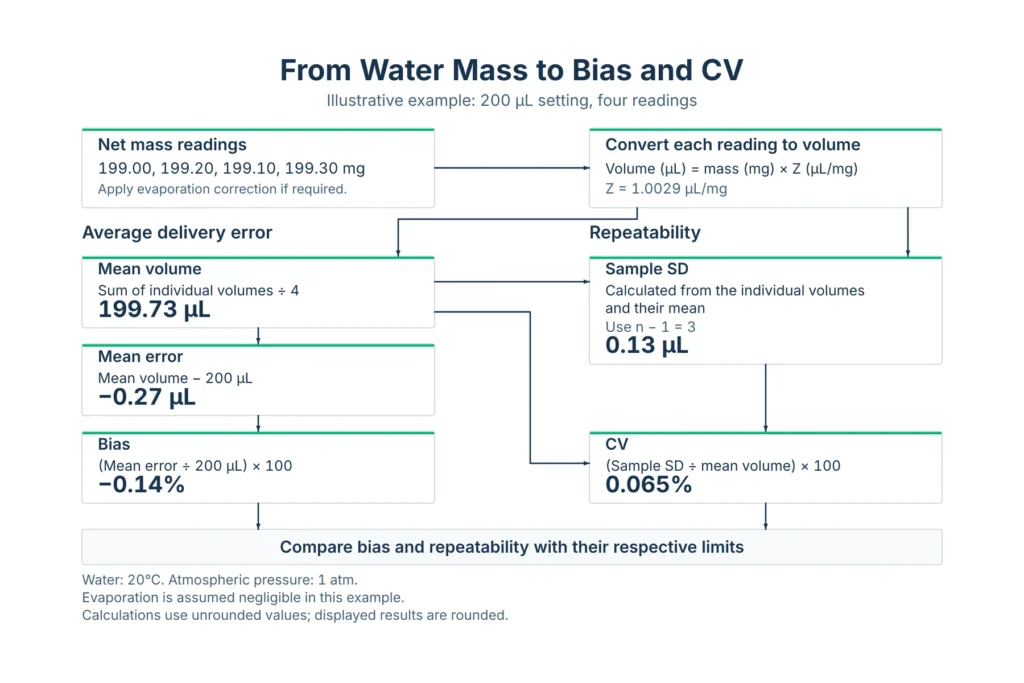
The example below uses four illustrative mass readings at the 200 µL setting.
Convert Water Mass to Volume
Use the net mass of each individual dispense. If the measurement procedure requires an evaporation correction, apply it before converting mass to volume and retain both the original and corrected values. This example assumes evaporation loss is negligible under the test conditions, so no evaporation correction is added.
Delivered volume (µL) = mass used for conversion (mg) × Z factor (µL/mg)
For distilled water at 20°C and an atmospheric pressure of 1 atm, the reference conversion table gives a Z factor of 1.0029 µL/mg. For your measurements, select the factor corresponding to the recorded conditions using the table or calculation specified by your method.
| Reading | Net water mass (mg) | Converted volume (µL) |
|---|---|---|
| 1 | 199.00 | 199.58 |
| 2 | 199.20 | 199.78 |
| 3 | 199.10 | 199.68 |
| 4 | 199.30 | 199.88 |
For the first reading:
199.00 × 1.0029 = 199.5771 µL, displayed as 199.58 µL.
Keep the unrounded converted values for subsequent calculations. Round only the final reported results.
Calculate Mean Volume and Percentage Bias
Mean volume = sum of converted volumes ÷ number of readings
Mean error = mean volume − selected volume
Percentage bias = (mean error ÷ selected volume) × 100
Applying these calculations to the four readings gives:
| Measure | Result |
|---|---|
| Mean delivered volume | 199.73 µL |
| Mean error relative to 200 µL | −0.27 µL |
| Percentage bias | −0.14% |
The negative sign indicates that the average delivery was below the setting. A positive value would indicate an average delivery above it.
Calculate Repeatability Using SD and CV
The sample standard deviation, or SD, describes the spread of individual delivered volumes around their mean. Calculate it in four steps:
- Subtract the mean volume from each individual converted volume.
- Square each difference.
- Add the squared differences and divide by the number of readings minus one. For four readings, divide by three.
- Take the square root.
For this example, the sample SD is approximately 0.13 µL.
The coefficient of variation, or CV, expresses this spread relative to the measured mean:
CV (%) = (sample SD ÷ mean delivered volume) × 100
Using the unrounded values gives a CV of approximately 0.065%.
Percentage bias uses the selected volume as its denominator; CV uses the measured mean. Bias describes the average delivery error, while SD and CV describe repeatability within the measurement series.
Compare the bias and repeatability results separately with the limits for the 200 µL test point. Assess the 20 µL series using its own readings and the limits applicable at that volume.
What Is an Acceptable Pipette Accuracy Range?
Acceptable performance depends on the pipette model, selected volume, and requirements of the intended work. Assess average error and repeatability separately.
Find the Correct Limits for Your Pipette and Test Volume
Locate the manufacturer’s current specifications for the exact model and volume setting. Check the associated tip and test conditions, and identify separate limits for systematic error and random error, corresponding to average delivery error and repeatability.
Match both the metric and its units. Compare an SD result with an SD limit, and a CV result with a CV limit. When specifications express errors as percentages, check the stated reference volume before converting them into microlitres.
Record any additional application requirements before testing. A pipette can meet its published specifications while providing insufficient control for a more demanding dispensing step. Also establish how measurement uncertainty will be handled in the acceptance decision.
Interpret the Result Against Those Limits
The comparison below uses hypothetical limits at the 200 µL setting:
- Percentage bias: within ±0.50%, equivalent to a mean error within ±1.00 µL.
- Repeatability: CV no greater than 0.20%.
These are teaching values, not specifications for a particular pipette. Replace them with the criteria applicable to your test.
| Result set | Percentage bias | CV | Comparison with the illustrative limits |
|---|---|---|---|
| Worked example | −0.14% | 0.065% | Both indicators within limits |
| Hypothetical case A | −0.70% | 0.065% | Average error outside the permitted range |
| Hypothetical case B | −0.14% | 0.30% | Repeatability exceeds the CV limit |
In the worked example, the mean error of approximately −0.27 µL falls within the illustrative ±1.00 µL interval. Case A shows why consistent deliveries can still have excessive bias. Case B shows why an acceptable average does not establish consistent individual deliveries.
Assess the 20 µL readings separately using the limits for that setting.
Use unrounded calculation values and the laboratory’s predefined decision rule when determining acceptance. That rule specifies how measurement uncertainty affects the decision, particularly when a result lies close to a limit.
Investigate results outside the applicable limits before relying on the pipette for the affected work. If the measurement setup or available data cannot support a reliable decision, record the check as inconclusive and arrange a more suitable assessment.
What to Do If Your Pipette Fails the Check
When a result falls outside the limits, we recommend checking the measurement process before adjusting the pipette. Keep it out of the affected work until the result has been resolved.
Start with the measurement record. Confirm that each mass value represents one dispense, the units and conversion factor are correct, and the acceptance limits match the pipette model and tested volume. Check how evaporation was controlled or corrected.
Use the result pattern to choose the next checks:
| Observed result | What to check next |
|---|---|
| Readings cluster together, but the mean error exceeds its limit | Confirm that the displayed volume matches the record. Review temperature equilibration, tip sealing, and completion of the dispensing and blow-out sequence. |
| Individual readings vary widely | Check tip seating, air bubbles, aspiration depth and speed, dispensing timing, and balance stability. |
| Readings progressively rise or fall | Look for changing weighing delays, evaporation loss, temperature changes, or balance drift. |
| Results remain outside the limits after the measurement process has been checked | Arrange qualified inspection and any necessary servicing. |
These patterns help guide the investigation, but cannot identify a specific fault on their own. The pipette–tip combination, operator technique, and weighing conditions can all contribute to the result.
After correcting an identified problem, repeat the complete measurement series at the affected volume. Record what changed and retain both the original and repeat readings.
Calibration establishes the relationship between the selected and delivered volumes; adjustment changes the instrument’s delivery. After repair or adjustment, complete the required calibration or verification at the specified test volumes before returning the pipette to use.
Keep the check and its follow-up together in one record:
- Date, operator, pipette and tip identification, and balance identification.
- Test volumes, conditions, and raw and corrected readings.
- Calculated results, acceptance limits and their sources, and the decision rule used.
- Investigation findings, corrective action, and repeat-test results.
Keeping these details together helps you compare checks over time and assess whether a problem recurs under similar conditions.
Frequently Asked Questions
Can I Check Pipette Accuracy Without a Balance?
Yes, with a suitable photometric measurement system. Photometric methods determine transferred volume through optical measurements and require their own equipment, calibration, and controls. ISO 8655-8 describes a photometric reference procedure.
The gravimetric method in this guide requires a balance. Visual inspection can reveal leakage or irregular aspiration, but cannot quantify delivered volume or percentage bias.
How Often Should I Check My Pipette?
Use a documented schedule based on frequency of use, application risk, and previous results. Include additional checks after a drop, suspected damage, maintenance, or unexplained changes in dispensing. Critical transfers may justify checking performance before starting the work. Routine checks provide evidence between scheduled calibrations.
Review the interval when usage changes or the check history shows recurring problems.
Does Passing a Water Test Guarantee Accurate Pipetting with Other Liquids?
No. The result applies to the tested pipette–tip combination, volumes, and water-test conditions. Different viscosity or volatility can change how another liquid behaves in an air-displacement pipette.
Assess the intended reagent at its working volume using a method suited to that liquid. For gravimetric measurements, use the appropriate mass-to-volume conversion for the reagent.
If you are comparing tip options for a particular liquid, our guide to testing low-retention pipette tips explains how to make a controlled comparison.
For workflows that require filter tips, explore Kelabscience’s rack packed filter pipette tips. Share your pipette model, routine working volumes, and packaging requirements with us to discuss the available configurations and identify options for evaluation in your laboratory.
