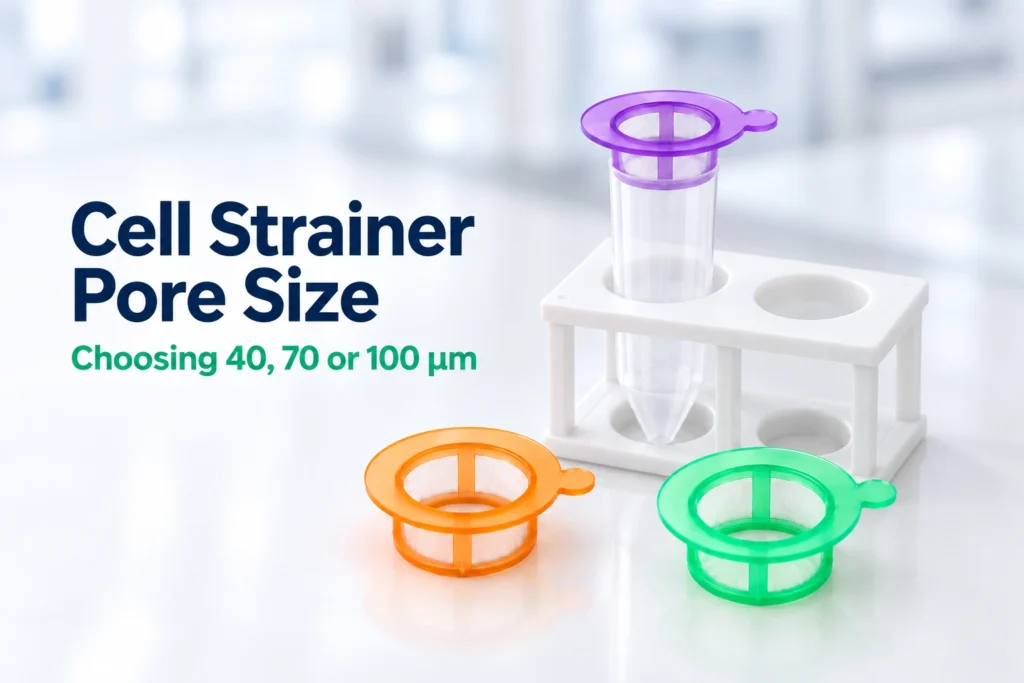
Choosing a cell strainer pore size means balancing the removal of unwanted aggregates with recovery of the cells needed for the next experiment. For workflows that collect cells in the filtrate, 100 µm offers a coarser opening, 70 µm an intermediate option and 40 µm a finer option. The appropriate choice depends on the target cells and the requirements of the next procedure; a smaller opening does not automatically produce a more useful suspension.
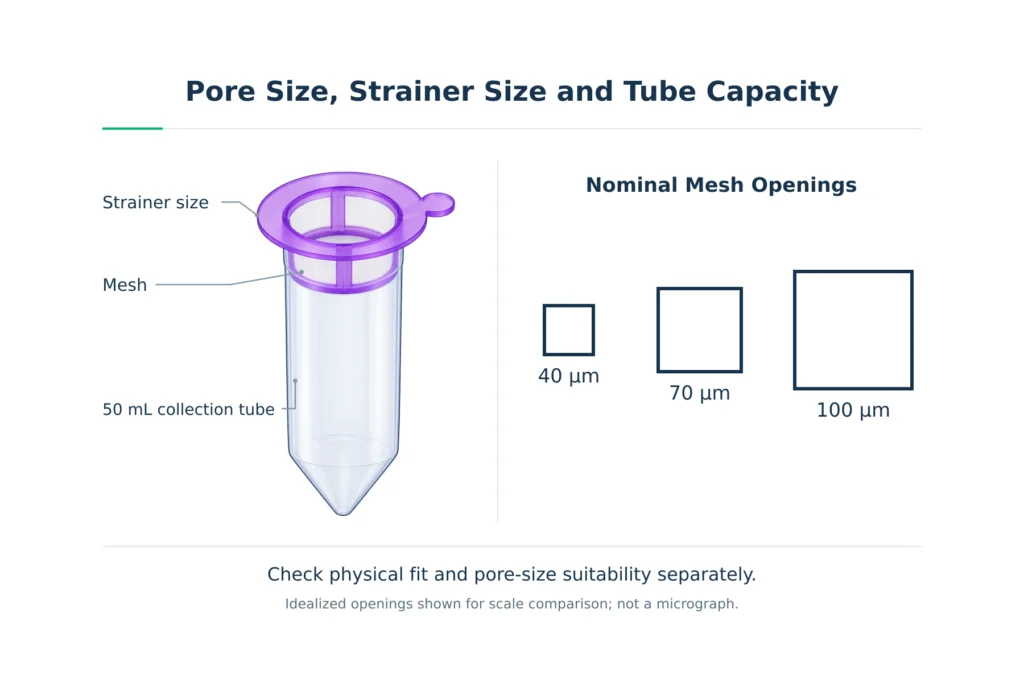
The 40, 70 and 100 µm designations describe nominal mesh openings. They are separate from the overall strainer diameter and the capacity of the receiving tube. Physical fit and pore-size suitability therefore need to be checked separately.
We recommend evaluating the choice through target-cell recovery, viability when relevant and performance in the intended workflow. This guide focuses on 40, 70 and 100 µm nylon mesh cell strainers. It explains how to select a pore size, limit avoidable cell loss during handling, troubleshoot clogging and compare filtration results under consistent conditions.
40 vs 70 vs 100 µm: What Changes?
Moving from a 100 µm opening to 70 or 40 µm can increase the retention of smaller aggregates. It can also retain larger target cells or clusters containing cells needed for the experiment. The useful result depends on which material is removed and which cells remain in the collected suspension.
The comparison below describes relative expectations for similar strainer formats and handling conditions, with the target cells collected in the filtrate.
| Pore size | Expected filtration effect | Main consideration |
|---|---|---|
| 40 µm | Can retain smaller aggregates that may pass through a 70 or 100 µm mesh. | Larger target cells or desired clusters may also be retained, and aggregate-rich samples can obstruct the mesh. |
| 70 µm | Provides an intermediate opening, retaining some material that may pass through a 100 µm mesh. | Smaller unwanted aggregates may still pass, while larger target cells or desired clusters may be retained. |
| 100 µm | Can retain coarse tissue fragments and large clumps while allowing larger structures through than finer meshes. | The filtrate may still contain aggregates that interfere with the next procedure. |
These are relative filtration characteristics, not fixed assignments to particular cell or tissue types. The condition of the prepared suspension matters: dispersed cells and cells still embedded in tissue fragments present different separation problems.
What Can Still Pass Through the Mesh?
Pairs of small cells and small clusters may pass through a mesh opening along with individual cells. Passing a sample through a 40 µm strainer therefore does not establish that every cell in the collected suspension is a singlet.
Small cell fragments and individual dead or dying cells may also pass through. Filtration can reduce larger clumps and aggregated debris, but it does not distinguish cells by viability. Assess single-cell content separately, and evaluate viability when relevant to the intended workflow.
Why Finer Filtration Can Change Cell Recovery
Cells retained by the mesh may include part of the population needed for analysis. This can happen when individual target cells are too large to pass readily or remain attached to larger clusters or tissue fragments.
In a partially dissociated sample, retaining a cluster also removes its constituent cells from the filtrate. A finer mesh may therefore reduce visible clumping while reducing target-cell recovery. Recovering those cells as singlets requires a suitable dissociation method.
Selective retention has also been observed experimentally. In a study of a mechanically isolated adipose-tissue cell preparation, researchers found multicellular vascular structures in material retained by a 100 µm filter. The filtrate contained predominantly single cells together with smaller vascular structures.
For mixed populations, total cell recovery alone may therefore be insufficient to assess filtration. Check whether the required populations remain represented in the filtrate, particularly when some occur within larger structures.
How to Choose a Pore Size for Your Sample
We recommend narrowing the options in a consistent order: define what needs to be recovered, inspect the prepared suspension and check the requirements of the next procedure. This connects the choice of 40, 70 or 100 µm to the material you need to collect and the material you need to remove.
Define Which Fraction You Need to Collect
For many cell preparation workflows, the desired fraction is the filtrate: the liquid and cells that pass through the mesh into the receiving tube. The opening needs to accommodate the target cells while retaining larger unwanted material.
Some workflows instead recover intact cellular aggregates from the material retained above the mesh. These require a device and recovery procedure suitable for retrieving that fraction. Establish the collection objective before choosing a pore size, because a cluster removed successfully in one experiment may be the material another experiment needs to preserve.
Inspect the Prepared Cell Suspension
Examine a representative aliquot after the intended dissociation and resuspension steps. Microscopy or an appropriate imaging method can help distinguish individual cells, multicellular clusters and remaining tissue fragments. Assess the range of target-cell sizes, including larger cells that need to be recovered.
An average cell diameter can hide a population of larger target cells within a mixed suspension. Use the observed size range to shortlist a mesh opening that gives the target cells room to pass. Nominal pore size alone does not guarantee recovery: cells that would otherwise fit may remain in larger clusters or be retained as material accumulates on the mesh.
Also compare the unwanted material with the cells you need. Dispersed cells mixed with occasional coarse tissue fragments present a clearer opportunity for size-based separation than a suspension dominated by clusters containing the target population. Where many desired cells remain within undissociated material, review whether they can be released under conditions compatible with their viability and intended use before selecting a finer mesh.
Check the Requirements of the Next Procedure
Identify any filtration requirement in the downstream assay, instrument instructions or established laboratory protocol. Check whether it specifies a pore size, a particular device format or filtration at a defined preparation stage. A pore size specified for initial tissue processing does not necessarily meet the requirements for the final sample entering an instrument.
If the prescribed opening conflicts with the dimensions of the cells you need to recover, resolve that conflict before processing the sample. Possible routes include a validated alternative preparation method or a downstream configuration suitable for the target cells. Simply increasing the opening may allow material through that the next procedure cannot tolerate.
Turn Those Observations Into a Shortlist
The examples below show how observations can guide a shortlist when the desired cells are collected in the filtrate. Each candidate still needs to meet the requirements of the downstream procedure.
| Observation in the prepared sample | Candidate approach | What needs to be established |
|---|---|---|
| Target cells are well below 40 µm, but unwanted aggregates remain after 70 µm filtration. | Evaluate 40 µm alongside 70 µm. | Whether the finer mesh reduces the problematic aggregates while maintaining acceptable target-cell recovery. |
| Some target cells approach the size of a 40 µm opening, while the unwanted material consists mainly of coarse fragments. | Consider 70 or 100 µm, if permitted downstream. | Which opening provides sufficient target-cell passage and adequate fragment removal. |
| Desired cells and unwanted aggregates overlap substantially in size. | Reassess sample preparation or the separation method. | Whether dissociation or another suitable separation approach can create a distinction that mesh filtration can use. |
An overlap in size is a practical limit of pore-size selection. If the opening needed to pass the desired cells also passes the unwanted material, changing between 40, 70 and 100 µm may not provide the required separation.
Once you have shortlisted a pore size, review the 40, 70 and 100 µm cell strainer specifications to check the device format, tube compatibility and packaging.
Which Pore Size Should You Use Before Flow Cytometry?
A 40 µm cell strainer can be suitable for final filtration when the target cells can pass through the mesh and the instrument protocol accepts that pore size. A 70 µm strainer may also be appropriate in a validated preparation workflow. The choice depends on the cells, the remaining aggregates and the configuration of the analyzer or sorter.
Match the Filter to the Instrument Configuration
For droplet-based cell sorting, the Guidelines for the use of flow cytometry and cell sorting in immunological studies by Cossarizza et al. (2017, Section V.1.1) recommend a filter opening smaller than the sorter nozzle opening as a general rule. The mesh removes larger material before loading, while the nozzle must accommodate cells under the selected sorting conditions.
A 70 µm sorting nozzle therefore does not imply that a 70 µm cell strainer is the appropriate final filter. Likewise, selecting a larger nozzle does not by itself establish which filter pore size to use. Consider the filter and nozzle together with the target-cell dimensions and the preparation requirements.
For an analyzer, follow the requirements of its sample introduction system rather than applying the sorter nozzle rule directly. If a prescribed 40 µm filtration step gives poor recovery of larger target cells, provide the flow facility with the observed cell-size range and recovery results. These observations can help the operator evaluate an alternative filter or instrument configuration.
Separate Initial Processing From Final Filtration
An early filtration step may remove coarse tissue fragments before washing or staining. Final filtration addresses aggregates present in the prepared suspension shortly before it enters the instrument. Cells may aggregate again during the intervening centrifugation, resuspension, incubation or transport steps.
Where final filtration is required, schedule it close to acquisition or sorting, at the stage specified by the applicable protocol. For example, using a 100 µm strainer during initial tissue processing does not establish that the suspension meets a facility’s final 40 µm filtration requirement. Check the requirement for the sample actually being loaded, including any preparation performed after the earlier filtration step.
Check the Suspension After Final Filtration
Use the post-filtration cell concentration when preparing the sample for loading. Assess viability when working with live cells, and check that enough of the target population remains for the planned analysis or sort. A concentration recorded before filtration may no longer describe the collected sample.
Filtration does not remove the need for appropriate singlet discrimination. Small cell pairs may remain in the suspension, and separate cells can pass through the interrogation region close enough together to produce a combined event. Apply the validated singlet-gating strategy for the assay, together with appropriate exclusion of nonviable cells when relevant.
Record the filter pore size and its position in the preparation sequence so that later runs can reproduce the same conditions.
How to Use a Cell Strainer While Limiting Cell Loss
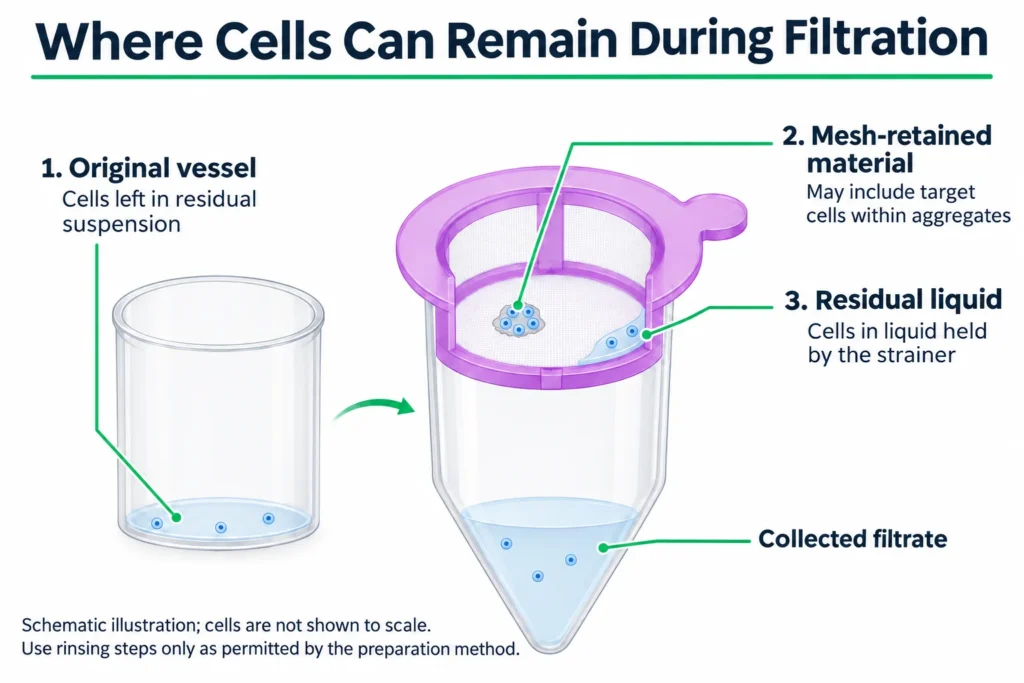
Once a pore size has been selected, handling affects how much of the available cell suspension reaches the collection tube. Cells may remain in the starting vessel, in liquid held by the strainer or in material retained on the mesh. The following steps concern filtering a prepared suspension, with the desired cells collected in the filtrate.
Prepare the Strainer and Collection Vessel
Place the strainer securely on a compatible collection tube, keeping the assembly upright and stable. Allow sufficient space in the receiving tube for the sample and any planned rinse. Handle the strainer by its frame to avoid touching the mesh.
Pre-wetting is included in some published methods, such as a mouse skeletal muscle cell-isolation protocol. Where your preparation method includes this step, use the specified buffer or medium and allow the mesh to drain before loading. Account for any pre-wetting liquid that enters the collection tube, and ensure that it is compatible with the sample and the next procedure.
For a small sample, consider how much liquid may remain in the device after drainage. A given residual volume represents a larger fraction of a smaller input. Compatibility with a 50 mL collection tube describes physical fit, but does not establish recovery performance at low sample volumes.
Load Gently and Allow Controlled Drainage
Gently resuspend settled cells before transferring the sample, using a mixing method appropriate for the cell type. This helps distribute the cells through the suspension and reduces the chance of leaving a concentrated cell fraction in the original vessel.
Add the suspension in portions that can drain without liquid approaching the rim. If liquid accumulates above the mesh, pause loading and assess the flow before continuing. Adding more sample to a poorly draining strainer can make the material already loaded harder to recover.
For gravity filtration, allow the suspension to drain without pressing retained material through the mesh. Some tissue-isolation protocols deliberately use a syringe plunger or another tool against the mesh during mechanical dissociation. Treat this as a separate, protocol-defined operation rather than a way to accelerate filtration of an already prepared suspension.
Recover Residual Cells With a Defined Rinse
When permitted by the preparation method, rinse the original sample vessel with a defined amount of compatible buffer or medium and pass that rinse through the strainer. This helps recover cells left behind during transfer. A gentle rinse of the mesh may also recover cells remaining in residual liquid.
Choose the rinse volume together with the required collection volume. Additional liquid can recover residual suspension while diluting the collected sample, so a lower cell concentration after rinsing does not by itself demonstrate greater cell loss.
During method development, collect the rinse fraction separately if practical and assess whether it contributes useful target cells. This helps establish whether the additional recovery justifies the extra collection volume. If combining the fractions requires a subsequent concentration step, include that step when evaluating the benefit of the rinse for the complete workflow.
Cell Strainer Troubleshooting: Clogging and Low Cell Recovery
Start by noting when the problem appears: during the first addition, as more sample is loaded, or after filtration is complete. This helps identify which part of the process needs investigation. More than one cause may contribute to the same observation.
| Observation | Possible explanation | Useful first check |
|---|---|---|
| Drainage is slow from the first addition. | A setup or wetting issue, a viscous suspension, or substantial material covering the mesh immediately. | Confirm correct assembly and inspect the sample. A buffer-only check on a separate, identical strainer can help distinguish a setup problem from sample-related restriction. |
| Drainage slows as successive portions are added. | Tissue fragments or aggregates are accumulating on the mesh. | Inspect the retained material and note how much sample passed before drainage slowed. Consider reducing the amount processed through each strainer. |
| Clumps reappear after filtration. | Continued aggregation, cell damage or extracellular DNA contributing to clumping. | Check viability when relevant, review holding conditions and note the time between preparation and observation. Assess whether the suspension is unusually viscous. |
| Measured cell recovery is low despite apparently normal drainage. | Transfer losses, residual liquid, retention of target cells or inconsistent counting. | Check input and collected volumes, mixing before sampling, and cells remaining in the original vessel or rinse fractions. |
Separate Filter Loading From Pore Size
When successive portions drain more slowly, investigate the amount of material processed through each strainer. Where the preparation protocol permits, process the remaining unfiltered suspension through fresh strainers of the same pore size. This addresses loading while preserving the intended size-selection step.
Dilution and distributing a sample across several strainers make different changes. Dilution lowers the concentration presented to the mesh, but does not reduce the total amount of suspended material. Using separate strainers reduces the amount each individual mesh must process.
If substantial undissociated tissue remains, review the upstream preparation. Moving from 40 to 70 or 100 µm may improve drainage by allowing more material through, but the collected suspension still needs to meet the downstream requirements.
Investigate Why Clumps Re-form
Extracellular DNA released from damaged cells can contribute to viscosity and cell clumping. A published protocol for nasal mucosa sample processing identifies excessive free DNA as one cause of clumping and discusses DNase I adjustment in its troubleshooting guidance. Recurrent aggregation alone, however, does not establish that DNA is responsible in a different sample.
Check whether clumps are present immediately after filtration or develop during a later hold. Review sample holding conditions and assess viability when relevant. Use DNase only within an appropriate preparation method, with conditions compatible with the sample, buffer and downstream assay.
Locate the Loss Before Changing the Method
Compare the sample immediately before filtration with the collected filtrate, including any rinse fractions retained for the next step. Take the post-filtration measurements after completing any planned filtration rinses and before subsequent cell washing or centrifugation. A count taken only after later processing steps cannot establish how much loss occurred during filtration.
Check whether the apparent loss reflects inconsistent measurement. Poor mixing, unresolved clusters or different counting settings can affect the comparison. Include the collected volume when interpreting a concentration change, particularly when rinsing has added liquid.
If a specific target population is depleted, examine retained clusters and residual material where practical to help locate the loss.
We recommend changing one suspected contributor at a time during troubleshooting. Keeping the other preparation conditions consistent makes it easier to determine whether an improvement came from altered loading, handling or pore size.
How to Validate Your Cell Strainer Pore Size
Once you have shortlisted suitable pore sizes, compare their performance with your actual sample. The useful outcome is a suspension that meets the next procedure’s requirements while preserving enough of the cells you need. Cell recovery, remaining aggregates and viability when relevant provide different parts of that assessment.
Compare Pore Sizes Under Matched Conditions
Gently mix a representative suspension and divide it into comparable aliquots, using a separate aliquot for each candidate pore size. Passing the same sample through 100, 70 and 40 µm strainers tests a filtration sequence; it does not show how each pore size performs independently.
Keep the input volume, cell concentration, buffer, rinsing procedure, handling time and temperature consistent. Where possible, compare strainers with the same format, mesh material and effective filtration area. If these features differ, interpret the results as a comparison between complete devices rather than attributing every difference to pore size.
To isolate the filtration step, measure the collected sample after any planned filtration rinses and before subsequent cell washing or centrifugation. Repeat the comparison with independent sample preparations to check whether the result holds across the variation expected in routine work.
Calculate Recovery From Cell Number
Cell concentration alone cannot show how many cells were recovered. A rinse may lower concentration while adding recovered cells to the collection tube; liquid retained in the device may reduce the volume available for collection.
Calculate cell number from both cell concentration and sample volume:
Cell number = Cell concentration (cells/mL) × Sample volume (mL)
Then calculate recovery:
Cell recovery (%) = (Collected cell number ÷ Loaded cell number) × 100
Use the volume actually loaded onto the strainer, excluding any aliquot removed beforehand for counting. For the output, include all filtrate and rinse fractions retained for the next step, measuring their combined volume before removing post-filtration counting aliquots. Concentrations should already account for any dilution used during the counting assay.
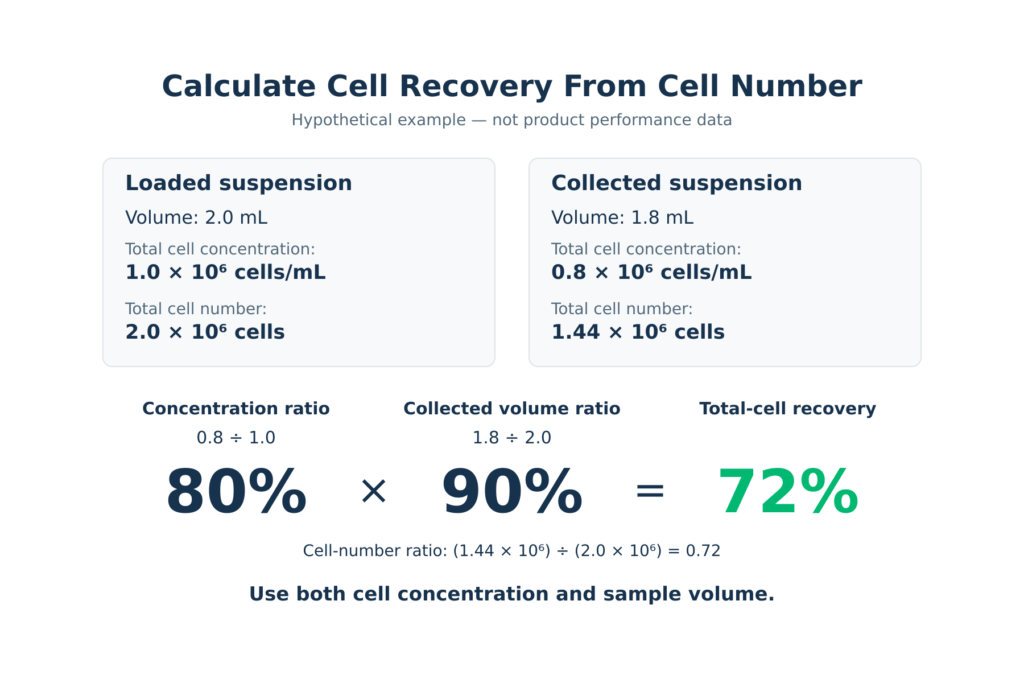
The following hypothetical example illustrates total-cell recovery and does not represent experimental or product performance data:
| Measurement | Loaded suspension | Collected suspension |
|---|---|---|
| Volume | 2.0 mL | 1.8 mL |
| Total cell concentration | 1.0 × 10⁶ cells/mL | 0.8 × 10⁶ cells/mL |
| Total cell number | 2.0 × 10⁶ cells | 1.44 × 10⁶ cells |
Total-cell recovery = (1.44 × 10⁶ ÷ 2.0 × 10⁶) × 100 = 72%
Comparing concentrations alone would suggest 80%, overlooking the smaller collected volume.
Use the same counting method before and after filtration. For total-cell recovery, use total-cell counts in both parts of the calculation; for viable-cell recovery, use viable-cell counts in both. If aggregates prevent reliable enumeration of the input, resolve that measurement limitation before interpreting an apparent change in recovery.
Assess Viability and Target-Cell Recovery Separately
For live-cell workflows, assess viability alongside cell recovery. Viability describes the proportion of counted cells classified as live, so a higher viability percentage can coexist with fewer recovered live cells. Calculate absolute viable cell numbers as follows:
Viable cell number = Total cell number × Viable fraction
For example, enter 90% viability as 0.90. If the counting instrument already reports viable cell concentration, multiply that concentration by the sample volume directly; applying the viability fraction again would underestimate the result.
For mixed populations, also assess the cells relevant to the experiment. An unchanged percentage of target cells does not establish unchanged recovery if the total cell number has fallen. Compare absolute target-cell numbers using consistent identification criteria before and after filtration.
Evaluate Suitability for the Next Procedure
Define the downstream requirements before comparing candidates: sufficient target cells, suitable viability when working with live cells, an acceptable aggregate burden, and a usable final volume and concentration. These requirements depend on the sample and application; a single recovery or viability threshold cannot establish suitability for every workflow.
Assess remaining aggregates with a consistent method, such as microscopy, and confirm that the suspension performs adequately in the intended procedure. Higher recovery is only useful when the collected material also meets those requirements.
Record the selected pore size together with the device format, sample type, input load and rinsing conditions. If those conditions change substantially, reassess performance before carrying the same choice into the revised workflow.
FAQs About Cell Strainer Pore Size
Can I Use a 40 or 100 µm Cell Strainer Instead of a 70 µm Strainer?
Treat either substitution as a change to the preparation method. A 40 µm mesh may retain additional aggregates but can also retain desired cells or clusters. A 100 µm mesh may allow material to pass that the 70 µm mesh would have retained. Before switching, compare target-cell recovery and remaining aggregates with the original setup, and confirm that the collected suspension meets the downstream requirements.
Should I Filter Through 100, 70 and 40 µm Strainers in Sequence?
Not every sample needs all three stages. A coarse filtration step can remove larger fragments before they reach a finer mesh, but each stage should have a defined purpose in the preparation method. The appropriate sequence also depends on whether the desired material is collected in the filtrate or retained above the mesh.
Each additional stage introduces another opportunity for cells to remain on the mesh or in residual liquid. Evaluate the complete sequence to confirm that it provides the required aggregate removal while preserving enough of the target population.
Are Cell Strainer Colors Standardized Across Brands?
Color codes differ between manufacturers and product ranges, so the same frame color does not reliably identify the same pore size across products. Check the pore size stated on the packaging and in the product specifications, particularly when changing suppliers. Record the pore size in micrometers and the product reference in your method, rather than identifying a strainer only by its color.
Kelabscience offers 40, 70 and 100 µm nylon mesh cell strainers designed for use with 50 mL conical centrifuge tubes, supplied sterile in individual packaging. See our cell strainers for product specifications and packaging details.